If you’re considering switching your recreational vehicle’s lead-acid batteries for lithium-ion ones, look at the following facts, tips, and tricks before you do so. While traditional lead-acid batteries can provide plenty of power to your RV, they also come with their drawbacks. For one thing, they are heavy and, as a result, add drag to your vehicle. And for all their size and weight, they don’t store enough energy for your various needs. They also take far longer to charge than lithium-ion batteries, retain less energy, and can even get weak and lose their ability to charge if they aren’t allowed to discharge before reaching peak strength. To top it all off, lead-acid batteries are an environmental hazard.
On the other hand, lithium-ion batteries work better, are cleaner, charge faster, and provide a lot of power. Even though they can initially cost more to purchase, eventually, they pay for themselves through performance and less maintenance. After a few months on the road, you’ll wonder why you ever hesitated to replace your clunky old lead-acid batteries.
You should leave major upgrades to your vehicle to an electrician or other recreational vehicle mechanic. That said, there are ways to make the switch without risk. Here’s how to upgrade your RV to lithium batteries.
Power Up!
First, determine the voltage required by your RV. Most lead-acid RV batteries run to 12 or 12.6 volts. Stick with that voltage for your lithium-ion battery replacements. You may encounter 24-volt batteries, but these are not the norm, and if you replace a 12-volt battery with a 24-volt, you may need to rewire your RV. Otherwise, you run the risk of overheating and frying the vehicle’s components, among other issues. Once again, consider leaving that sort of job to an expert, but expect a high price tag on the work and parts involved.
Keep a Lead-Acid Battery
Lithium-ion batteries are great for your electrical systems; they allow you to run your appliances, outside lighting, and so forth. However, you should still retain a lead-acid battery for your vehicle’s starter. DC lead-acid batteries are perfect for delivering a swift blast of power to rev up the engine and keep it running. Lithium batteries, on the other hand, are designed to handle long-term use while holding more power. While using them as a power source for your entire RV justifies the cost, you can save a little by keeping an old reliable lead-acid battery under the hood.
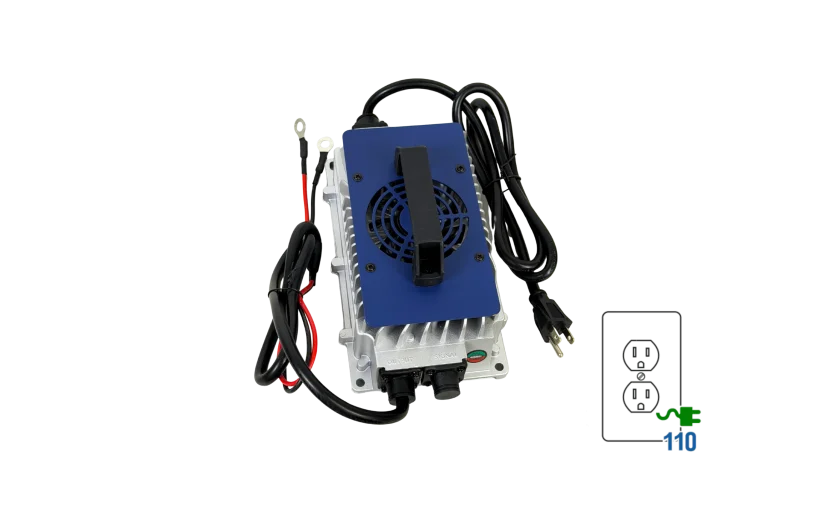
Staying in Charge
While you’re pondering how to upgrade your RV to lithium batteries, think about how the batteries will charge. In general, lithium batteries hooked to your RV’s alternator may be able to charge on their own through use. Make sure they can do this. You may need to install or provide an external charger to keep power levels steady and full. If you have solar panels, do research on your setup, and make sure you’re picking lithium-ion batteries that are compatible with your solar power array. Some chargers will have no issue with the new RV lithium battery pack. However, others—even if they can deliver the charge—will take a long time to charge. According to the experts, some chargers can be easily programmed to deliver the right voltage to your lithium-ion batteries. Check your recreational vehicle’s owner’s manual to ensure you’re picking the right equipment, and that they won’t “squabble” in the future. The manufacturer may be an excellent source of knowledge, so consult with them about the specifics when you’re setting everything up.
Conversing About Inverters
An inverter is a device that turns direct current into alternating current. You may need this because some devices on your RV run on AC instead of DC. Thus, the current delivered by your RV lithium battery pack should be able to enter the inverter and provide 120 volts of electricity to appliances such as air conditioning units, coffee makers, crock pots, and so on.
When you’re dealing with pre-installed inverters, you shouldn’t experience any issues as long as the voltage is compatible. So, simply leave them alone. Others recommend that if the inverter has a low voltage cut out, you should consider changing it. Your batteries should have a specific low voltage for inverters. Consult the owner’s manual or communicate with the manufacturers of the battery and RV before altering anything in the vehicle.
Hot and Cold
One thing to know about lithium-ion batteries is that they charge more efficiently and faster when they’re warm. When the temperature drops you can warm them up in the sun or by placing them near a heater (but not too near.) Overall, in colder months and climates, keep tabs on battery temperature—otherwise, you may find yourself powerless in the middle of nowhere.
When a battery gets too hot, it isn’t always ideal for RV lithium battery packs. If they’re running hot, especially during or after a big charge, consider putting them in a cool place for a brief time until they become cool. Doing this every so often is a good way to make your batteries last a touch longer.
Keep Them Away From Water
Your lithium-ion batteries should be safely ensconced in a space on your vehicle that’s free from water and moisture. Your batteries’ casings should also be waterproof, but that won’t entirely keep out water if the batteries are submerged or otherwise breached. When lithium mixes with water it can develop lithium hydroxide, which is a fire hazard. Keep your batteries in a dry place for caution. If you are looking for a water-resistant battery, a certain product like our 12V SEAL can do the job!
Get Started With Lithium Today
Now that you know about lithium batteries, you can look into buying a few for yourself to improve your vehicle. Over time you’ll see the results through the comfort and clean-running energy of your RV lithium battery pack! Visit Bigbattery.com/rv/ to view lithium RV/Van batteries today!
Facebook
Twitter
LinkedIn
Pinterest